
Carrito
0
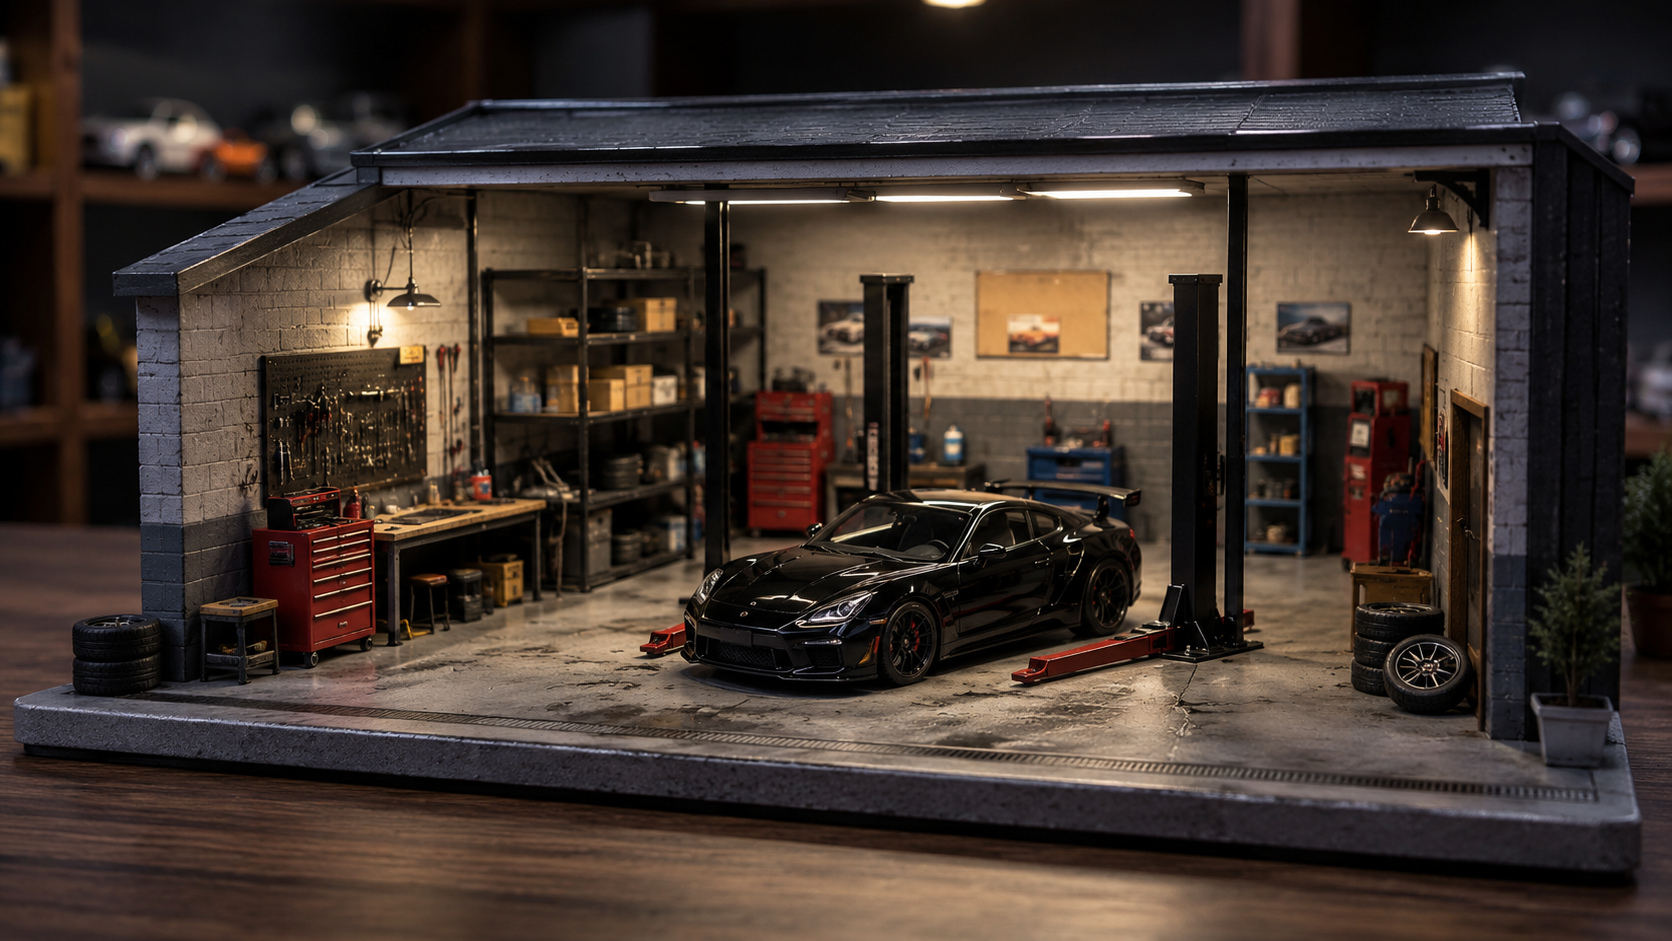
A diecast car can look great on a shelf, but a diecast car inside a garage diorama tells a story. Instead of simply displaying a model, you create a miniature world around it: a repair bay, a collector’s garage, a race-prep shop, a dealership corner, or a late-night tuner workshop.
That is why garage dioramas have become so popular with diecast collectors. They make small cars feel more alive, especially in 1:64 scale, where a few smart details can turn a simple display into a realistic scene.
The good news is that you do not need to be a professional model builder to create one. With the right scale, layout, lighting, accessories, and display choices, you can build a garage diorama that looks clean, believable, and collector-worthy.
Start With the Right Scale
Before buying accessories or planning the scene, choose your scale. The most common scale for garage dioramas is 1:64 because it is compact, affordable, and easy to display. It also works well with many collector-favorite diecast cars, including JDM models, muscle cars, race cars, trucks, and emergency vehicles.
If most of your collection is already 1:64, stay consistent. Mixing scales can make the scene look unrealistic. A 1:64 car beside 1:43 furniture or 1:24 tools will immediately look wrong, even if each piece looks good on its own.
Collectors who are still learning scale basics can start with a 1:64 scale diecast guide before building a full scene. Once you understand scale, it becomes much easier to choose cars, lifts, figures, signs, tools, and background pieces that look natural together.
Choose a Garage Theme
A realistic diorama starts with a clear theme. Do not just place random cars and accessories together. Decide what kind of garage you want to build.
Popular garage diorama themes include:
-
A classic repair shop
-
A JDM tuning garage
-
A race-prep workshop
-
A dealership showroom
-
A gas station service bay
-
A luxury collector garage
-
An off-road workshop
-
A small-town mechanic shop
-
A drift car garage
-
A movie-car display scene
The theme will guide your color choices, accessories, car selection, and layout. For example, a race garage may need tool carts, sponsor signs, spare wheels, and performance cars. A classic repair shop may look better with older cars, oil drums, work benches, and weathered flooring.
If you want a polished scene without building everything from scratch, G-Fans diorama models can help you create garage, showroom, storefront, gas station, and display-style setups with a more finished look.
Pick the Right Diecast Cars
The car is still the star of the scene. The garage should support the model, not overpower it.
Choose one hero car first. This is the main car people should notice when they look at the diorama. It could be a sports car on a lift, a classic muscle car being serviced, or a race car sitting in the center of the garage.
Then add supporting vehicles only if the space allows. A common mistake is overcrowding the scene with too many cars. In a small garage diorama, two or three well-placed cars often look better than six cars squeezed together.
For 1:64 displays, choose 1:64 scale diecast cars that match your theme. A garage scene feels more realistic when the cars belong in the same world. A JDM garage may feature Nissan, Toyota, Honda, or Mazda models. A muscle garage may focus on Dodge, Ford, Chevrolet, or Plymouth. A race shop may use rally cars, touring cars, NASCAR models, or track-focused builds.
Plan the Layout Before You Glue Anything
A realistic garage diorama needs space to breathe. Before fixing anything permanently, place all cars and accessories loosely on the base.
Think about how a real garage works. Cars need entry space. Mechanics need room to move. Tools should sit near work areas. Lifts should be positioned where a vehicle could actually drive in. Storage shelves should not block the main view.
A simple layout can include:
-
One main garage bay
-
One hero car
-
A side workbench
-
A tool chest
-
A wall sign or poster
-
A small storage corner
-
One figure or mechanic
-
A few loose details like tires, cones, crates, or oil cans
Leave some open floor space. Empty space makes the scene look more realistic and helps the main car stand out.
Use Flooring and Walls to Set the Mood
The floor and walls are what turn a basic display into a believable environment.
For garage floors, you can use printed concrete textures, plastic sheets, foam board, painted cardboard, or pre-made diorama bases. A clean showroom may use glossy gray or black flooring. A repair garage may look better with slightly worn concrete, oil stains, tire marks, or scuffed edges.
Walls should match the theme. A race garage can use sponsor decals and bright signage. A vintage shop can use muted colors, old posters, and weathered textures. A modern luxury garage may look better with clean walls, LED-style lighting, and minimal clutter.
Avoid making every wall too busy. If the background is overloaded with signs, shelves, posters, and tools, the cars can get lost.
Add Realistic Garage Accessories
Details make a diorama feel alive. The right accessories can make viewers believe something is happening inside the scene.
Useful garage accessories include:
-
Tool chests
-
Lifts
-
Work benches
-
Spare wheels
-
Tires
-
Oil drums
-
Gas pumps
-
Cones
-
Signs
-
Posters
-
Shelves
-
Mechanic figures
-
Cleaning supplies
-
Jacks
-
Car covers
-
Crates
-
Small lights
A good rule is to add details in layers. Start with large pieces like the lift, workbench, or wall structure. Then add medium pieces like shelves and toolboxes. Finally, add small details like tires, figures, and signs.
Do not use every accessory you own in one scene. Realism comes from placement, not quantity.
Use Lighting for a More Professional Look
Lighting can completely change a garage diorama. Even a simple setup can look more realistic with controlled light.
For a clean showroom look, use bright, even lighting. For a moody workshop look, use directional lighting from one side. For a night garage look, use small LED strips, miniature lamps, or soft backlighting.
If you plan to photograph the diorama, avoid harsh overhead light. It can create strong shadows and make small details look flat. Instead, use soft side lighting and experiment with angles.
A small LED strip along the ceiling or back wall can make the scene look like a real garage bay. Warm light creates a vintage shop feel, while cool white light gives a cleaner, modern showroom effect.
Add Signs of Real Use
A garage should not always look too perfect. Real garages have activity.
Small signs of use make the scene more believable:
-
Light tire marks on the floor
-
A toolbox left slightly open
-
Spare wheels stacked in a corner
-
A mechanic figure near the car
-
A lift holding a car in service position
-
A small oil stain near the engine bay
-
Posters or signs on the wall
-
A car parked at an angle instead of perfectly straight
These details help the diorama feel like a moment frozen in time rather than a product lineup.
Keep the Scene Clean Enough for Display
Realistic does not mean messy. A garage diorama should still look good on a shelf, desk, display case, or collector wall.
If the scene is for display, make sure the front view is strong. Place the hero car where it is easy to see. Keep the background interesting but not distracting. Use accessories to guide the eye toward the main subject.
Collectors who want to expand a scene over time can explore a broader dioramas collection for garage scenes, storefronts, service stations, display accessories, and other pieces that help turn diecast cars into a more immersive setup.
Common Mistakes to Avoid
The most common mistake is mixing scales. If the cars, figures, tools, and buildings are not the same scale, the scene will look off.
Another mistake is overcrowding. A garage diorama should not look like a parking lot unless that is the theme. Give each car enough space.
Also avoid using too many colors. Pick a clear palette. A black, gray, and red race garage can look sharp. A beige, brown, and silver classic garage can look warm. Too many unrelated colors can make the scene feel toy-like.
Finally, do not forget dust protection. Dioramas collect dust quickly because they have small parts and textured surfaces. If possible, display the finished scene inside an acrylic case or on a shelf that is easy to clean.
Final Thoughts
A diecast garage diorama is one of the best ways to make a collection feel more personal. It gives your cars context, personality, and a story.
Start with a clear scale, choose a theme, select one hero car, plan the layout, and add details slowly. Focus on realism, not clutter. A few well-placed accessories can do more than a crowded scene full of random pieces.
Whether you are building a JDM tuning shop, a classic repair garage, a race-prep bay, or a clean collector showroom, the best diorama is the one that makes your diecast cars feel like they belong somewhere.
With the right planning and the right details, a simple model car display can become a miniature garage that feels alive.